What is antifouling?
Antifouling is a specialist underwater paint applied to the hull of a boat to protect it against the growth of algae and barnacles. Growth on a boat’s hull may be fascinating to look at, however it is highly undesirable. It massively increases underwater resistance resulting in reduced speed and increased fuel consumption. Available in a range of colours, coating with antifouling should be part of any boat owners routine maintenance schedule.
Stage 1: Assessing my boat prior to antifouling
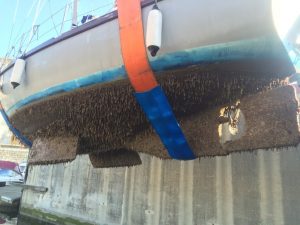
When I first purchased my boat I noticed that she seemed rather slow through the water. To fix this, I arranged for her to be lifted her out of the water so that I could inspect her hull. As you can see in the photo, there was extensive underwater growth. However, after half an hour with a pressure washer I was able to remove all but the most suborn of marine life!
After I had completed the pressure washing and given everything a good hose down, my boat was lowered onto the ground. Now was the time to inspect the hull more closely! I have to say that I was pleasantly surprised by the condition of the 45+ year old hull.
Checking Seacocks
First on my list of checks was the condition of all of the sea cocks, pipework and hull fittings. Luckily, my boat was born in an era of over-engineering and after a good cleanup, I found them to be in excellent condition with many years life left.
Replacing Anodes
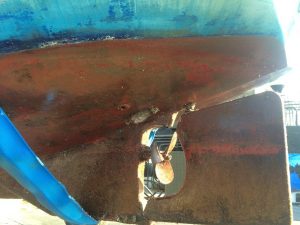
Next, I removed all of the anodes and sourced replacements. Anodes are critical for the protection of a boats metal components and should never be overlooked! A good chandlery will stock these and are relatively inexpensive. I found I was unable to easily remove two of the fixing bolts for the hull anode. Luckily, they were in excellent condition, therefore I decided to simply reuse these bolts. I thoroughly cleaned the bolts and covered them in masking tape to prevent paint adhering to them. This is extremely important as a good electrical connection is required for the anodes to work.
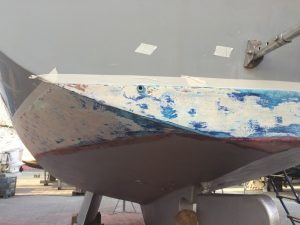
Checking the Keels
On to the keels! These needed to be checked carefully. My boat is a bilge keel which means that she is able to stand upright on the mud in little or no water. As a result, there is a risk of potential damage to her keels. Luckily, I found her bilge keels to be generally sound with just a few areas of minor damage. These would need repair to avoid the risk of water ingress which could result in Osmosis.
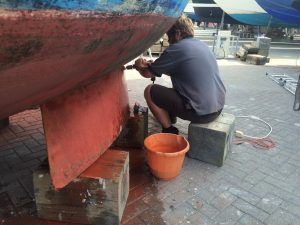
In order to repair the damaged keel, I first carefully removed all antifouling and general muck from the affected area. An electric drill with a nylon abrasive wheel attached proved invaluable for this task. Once finished, I dried the area using a low powered hot air gun before repairing using West System 105 Epoxy. This photograph is of me cleaning up the keel prior to undertaking the repair.
Other checks
The final task before concentrating on the antifouling was to carefully check the condition of the boats propulsion and steering systems. I found these to be generally in good condition, however I did however give the metal components several coats of Hammerite to protect them.
Stage 2: Preparing for antifouling
Every good trades-person will tell you that preparation is key! Antifouling is no different.
As mentioned, my boat is over 45 years old and therefore had a significant build up of antifouling through many years of repainting. I realised that the paint was generally sound and I therefore decided that there was little point in removing this. Indeed, I felt that the many layers of paint would give added protection to the hull. I opted to simply scrape the loose flaking layers off using a sharp paint scraper. It is important to remember that the whole purpose of antifouling is to prevent growth of sea life and therefore not wise for me to breathe in! Also, It is even more important when working on older vessels such as mine due to the more dangerous chemicals used in older paints. I protected myself with a quality 3M Mask and overalls.
Finally I went over the entire hull with a course 80 grit paper to give the new antifouling a solid Key. Whilst doing this, I ensured that the Henry was running to keep the dust down.
Now that the preparation work was complete, it was time to move onto the more rewarding task of painting! I began preparing my work area for application of the antifouling by giving it a good sweep with a quality broom. Next, I vacuumed the hull with my trusty old, battle scarred Henry!
Masking up!
And finally on to masking up! I needed to carefully apply a length of masking tape along the waterline that would give me a nice crisp line. To help me do this, I had some photographs of the boat from when she was in the water. Luckily, it was clear to me that the previous water line was correct. I therefore simply applied the tape along the line of the old paint. Here I must emphasise that buying good quality masking tape is essential as cheap tape can be a nightmare to remove! I used Frog Tape which I must say was excellent and left no residue.
Many boats have a coloured stripe of slightly harder antifouling just below the waterline (as was the case on my boat). However, I took the decision that future applications would be faster if this was removed. Should you wish to apply a boot stripe, I can recommend Trilux 33. This was the paint that had been used by her previous owner and was still in good condition after a number of years in the water.
Stage 3: Applying the antifouling
Now the time had come to apply the paint! Since I would be applying the anitfouling over many years worth of older paint, I decided to apply two coats of International Primocon. This is a specialist primer that will not erode like antifouling and is designed to give a solid base coat over which antifouling can be applied. I applied the Primocon using a quality roller and paint tray allowing sufficient drying time per coat! This is a messy job and I highly recommend wearing some disposable overalls!
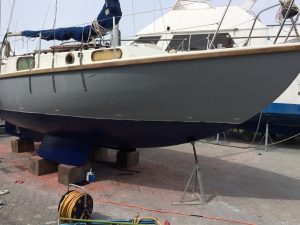
The following photograph shows the water line marked up with the first coat of Primocon partially applied.
After the Primocon had dried, I thoroughly washed the roller and tray before applying two coats of Cruiser Uno antifouling. I found that 5 litres for sufficient for my 26′ hull. On a bright sunny day, application of two coats was easily achievable within the day. As I am sure you will agree, she is starting to look quite smart!
Once I had tied up and removed the masking tape, I could move on to my next task – Visiting the local pub!
Tools and equipment used in this project:
- International Primocon
- International Cruiser Uno
- Frog Tape
- Numatic Henry Vacuum cleaner.
- Paint Scraper.
- Face Mask
- Disposable overalls.
- West System 105 Epoxy
- Nylon abrasive wheel
[Mark’s Antifouling Top Tip! Whilst your boat is out of the water, remember to check and replace your anodes! These are essential in protecting your vessel’s metal components from galvanic corrosion. Its also a good idea to have a careful look at all under water components of your vessel. Pay particular attention to sea-cocks, rudder attachment, prop etc and repairing as necessary.]
Finally, don’t forget to read about my motorhome!
Website designed & maintained by Mark Richards Education.
Copyright. © 2020 Van and boat. All rights reserved.